Table of Contents:
1. Theme Installation2. Blog Front Page3. Widget Info Area4. Theme Options5. Custom Menus6. Typography Styles7. Shortcodes8. Supported Plugins09. Translations10. Child Theme11. Print / Save as PDF
Quick Specs (all Werkstatt measurements in pixels)
• default Featured image width: 1100 or smaller (the height is flexible)
• default post width: 600
• image width of images in overlay widget areas: 800
Note: You can install and run the Regenerate Thumbnails plugin to regenerate thumbnails for already published posts.
1. Theme Installation
After the successful theme purchase you will receive an email from us including your individual theme or theme bundle download link. With this link you can download the Werkstatt theme folder (werkstatt.zip).
1.1. Installation via the WordPress admin panel
After downloading the werkstatt.zip file to your local computer, please go to Appearance → Themes in your WordPress admin panel and click the Install button at the top of the page. Now click the Upload Theme button and upload the werkstatt.zip file from your computer. You can activate the theme by hovering over the preview image, here you will see the Activate button.
1.2. Installation via FTP
Alternatively you can also install the theme directly to your server with a FTP client (e.g. Filezilla). Just drop the un-ziped Werkstatt theme folder into your …/wp-content/themes/ folder. Now you can see the Werkstatt theme in your WordPress admin panel under Appearance → Themes → Available Themes. From there you can activate the Werkstatt theme.
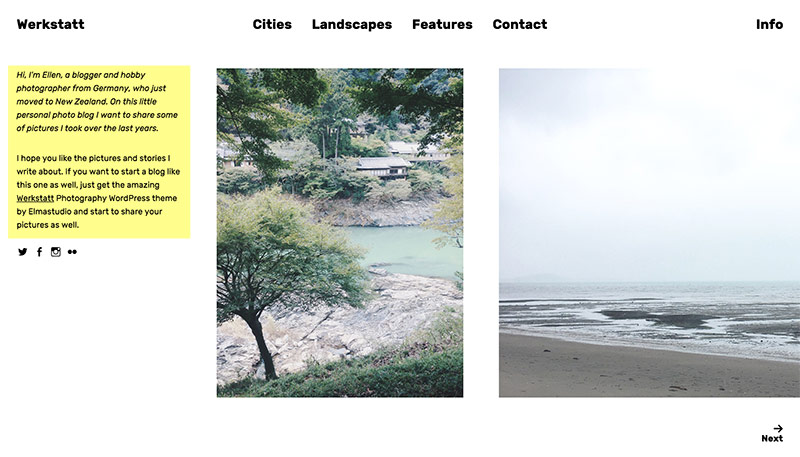
2. Blog Front Page
Werkstatt has a horizontally-scrolling blog front page showing your posts featured images (with the title, publish date and author name on image hover). Therefore it’s important that you include a Featured image with every post.
You can also show a short intro text (HTML is allowed) at the beginning of your blog page. To include the text go to Appearance → Customize → Theme Options.
3. Widget Info Area (Overlay)
Werkstatt comes with a four-column widget area that can be viewed via the “Info” text link at the right top of your website.
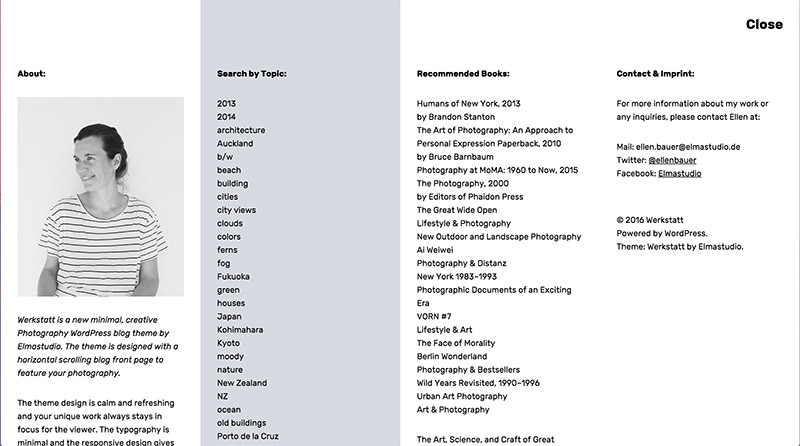
You can include your widgets to the four Overlay Widget Areas under Appearance → Widgets or under Appearance → Customize → Widgets.
To show an about text with an image you can just use a default text widget and copy/paste the following code in it. Then you need to upload your own about image (the image width should be 800px, the height could be 960) via the Media → Add New and paste your image URL into the code.
[code]
<img width=”800″ height=”960″ src=”YOURIMAGEURLHERE” class=”overlay-img” alt=””>
Your text here…
[/code]
4. Theme Options
Under Appearance → Customize you will find all customization options for the Werkstatt theme.
Under Logo you can upload your own logo image to use instead of the default site title and description text. You can then uncheck the “Display Header Text” option in the Site Identity tab.
In the Colors tab you can change your general background color, your link color and the site title color.
A note on custom CSS:
To include custom CSS you can use the Custom CSS feature of the Jetpack WordPress plugin, in case you have already installed the Jetpack plugin. Or you can use the Simple Custom CSS WordPress plugin. Please read our blog post “How to use Custom CSS in WordPress” for further info.
5. Custom Menu
You can find the custom menu option for Werkstatt under Appearance → Menus. Here you can include pages, categories, tags or custom links as menu items. You can choose your new custom menu as the “Primary menu” of your website.
To show your Social Links with icons under your Intro text on the blog front page, you need to create another new custom menu under Appearance → Menus. Give your new menu the name „Social“ and add your social profile links using the custom „Links“ option. You can include ULRs with your own titles (Navigation Labels) for the following social sites:
Codepen, Digg, Dropbox, Facebook, Flickr, Google+, Instagram, LinkedIn, Pinterest, Path, Dribbble, PollDaddy, GetPocket, Reddit, Skype, StumpleUpOn, Tumblr, Twitter, Vimeo, YouTube, Spotify, WordPress.com, WordPress.org, Feed (urls with /feed/), Email (using mailto).
Now you only need to mark your new menu as Social menu under Menu locations.
6. Typography Styles
You can use a number of typography styles to design more interesting posts and pages. (Here is an overview of all typography styles in the Werkstatt live demo).
Intro text – to add an extra big intro text style to a text paragraph, just use the CSS class “intro”.
[code]
<p class=”intro”>Your intro text here…</p>
[/code]
Dropcaps – To highlight a paragraph with a drop cap letter you can just wrap the first letter of the paragraph in a span tag with the CSS class of “dropcap”.
[code]
<span class=”dropcap”>F</span>irst letter…
[/code]
Pull Quotes – You can use pull quotes on your text, by wrapping a sentence or short text in a p tag with the CSS class “pull-left” or “pull-right” for left or right aligned pull quotes.
[code]
<p class=”pull-left”>This is a left-aligned pull quote text.</p>
[/code]
Note text – You can add a note in your text or at the bottom of a page or post. Just copy and paste the following code:
[code]
<p class=”note”>Write your note here…</p>
[/code]
Wide content areas – You can add extra wide content areas in your posts and pages using the following additional div container with the CSS class “wide-content”:
[code]
<div class=”wide-content”>
Your content here, images, text or iframe videos…
</div>
[/code]
7. Shortcodes
You can find a documentation and code snippets (ready to copy/paste) for all Werkstatt shortcodes on the Werkstatt live demo Shortcode page.
8. Supported Plugins
Werkstatt is ready to be used with the following WordPress plugins:
• Jetpack for share buttons, extra widgets, Jetpack Carousel Slideshows, Tiled Galleries and Infinite Scroll
• Contact Form 7 for forms
09. Theme Translations
Werkstatt is ready for theme translations. You can add your own translation or customize an existing translation easily using the WordPress plugin Loco Translate. (It would be great if you like to make your Werkstatt theme translation available to other theme users. Please let us know, if you want to share your translation.)
10. Child Theme for Customizations
If you want to customize the Werkstatt theme a little further and you need to change the code in the styleeheet (style.css) or in any of the theme template files, please consider creating a child theme for your changes. Using a child theme is quite easy and saves all your changes from being over written by a future update of the Werkstatt parent theme. You can find more information on creating a child theme in the article “WordPress Child Theme Basics” on the Themeshaper blog.
To get started you can download the sample child theme folder for the Werkstatt theme. Download: Werkstatt Child-Theme.
11. Print Doc / Save as PDF
To print out or save a PDF file of this Werkstatt theme documentation, just click in the Print Friendly button below. You can choose to exclude images from your print file or delete certain parts of the text.