[yellow_box]You can find even more infos, video-tutorials and a pdf theme documentation on the new Yoko theme page![/yellow_box]
Deutsche Theme Dokumentation
Yoko ist ein modernes und flexibles WordPress Blog-Theme. Durch das responsive Layout passt sich das Theme an die unterschiedlichsten Bildschirmgrößen an. Das Yoko-Design ist also sowohl für große Desktop-Monitore, für Tablet PCs wie dem iPad oder für kleine Smartphone-Screens optimiert. Um deinen Blog noch individueller und vielseitiger zu gestalten, kannst du außerdem die neuen Artikel-Formatvorlagen (z.B. für Bildergalerien, Notizen oder Zitate) nutzen, ein eigenes Logo oder Headerbild einfügen, deinen individuellen Hintergrund und eine eigene Linkfarbe wählen. Am besten du schaust dir Yoko einfach in der Live-Demo an oder lädst es dir gleich herunter, um es selbst auszuprobieren.
Live-Demo und Download
Das Yoko Theme im Überblick
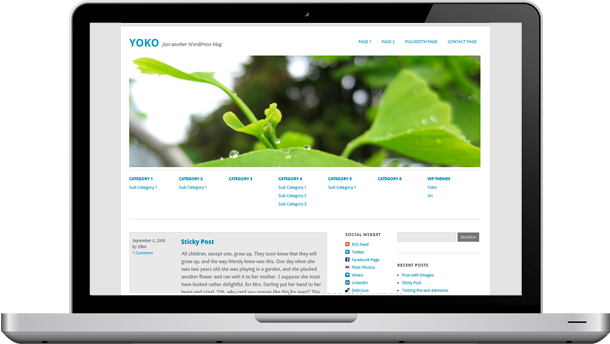
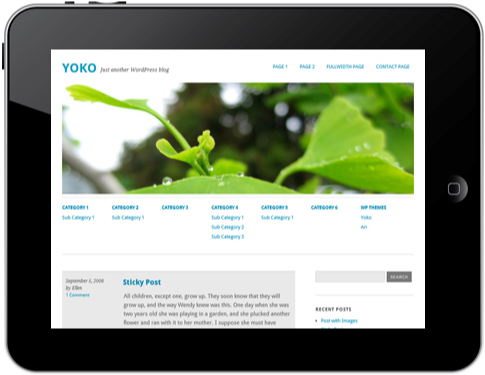
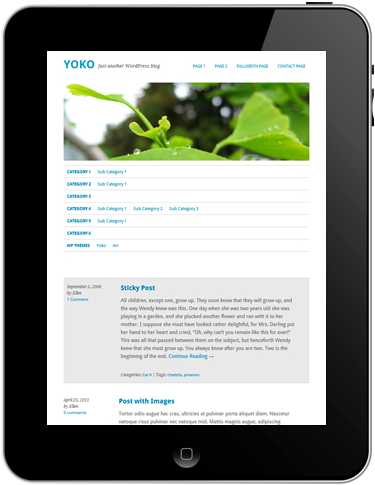
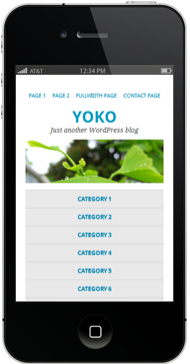
Tablet PCs im Hochformat und Smartphones, einspaltiges Layout.
Die Theme-Features
- Responsive Layout mit CSS3 Media Queries: Das Theme-Layout passt sich der jeweiligen Bildschirmgröße an. Optimal für die Ansicht auf Tablet PCs und Smartphones.
- HTM5 (Fallback für Internet Explorer < 9)
- Individuelle Linkfarbe, Headerbild, Hintergrund und Logobild
- Zusätzliches Navigationsmenü (Sub Menu) unter dem Headerbild
- Theme-Optionsseite im Adminbereich
- Yoko Social-Links Widget mit Mini-Icons (RSS, Twitter, Facebook, Flickr, Vimeo, LinkedIn, Delicious Icons)
- Artikel-Formatvorlagen (post formats) für Standard, Aside, Gallery, Link, Video, Image und Quote (WordPress 3.1 wird benötigt)
- verschachtelte Kommentare (threaded comments)
- Artikel-Vorschaubilder (post thumbnails)
- CSS-Styling für das Contact Form 7 Formular-Plugin
- Verwendung der Google Web-Fonts Droid Sans und Droid Serif
- Theme ist zur Übersetzung vorbereitet (derzeit ist Yoko in Englisch, Deutsch und Französisch übersetzt)
Die Theme-Optionen erklärt
Du kannst dir das WordPress-Theme Yoko über den Download-Button oben im Artikel herunterladen. Den entzippten Theme-Ordner „Yoko“ lädst du dann, am besten mit Hilfe eines FTP-Upload Programms (z.B. das kostenlose Filezilla), in den Themes-Ordner (http://deinedomain.de/wp-content/themes/…) hoch. In deinem WordPress-Adminbereich kannst du jetzt unter Designs / Themes das Yoko-Theme auswählen und aktivieren.
1. Individuelle Link-Farbe und Logobild
Über die Theme-Optionsseite (Design / Theme Optionen) kannst du eine individuelle Linkfarbe bestimmen und dein eigenes Logobild im Headerbereich einfügen.
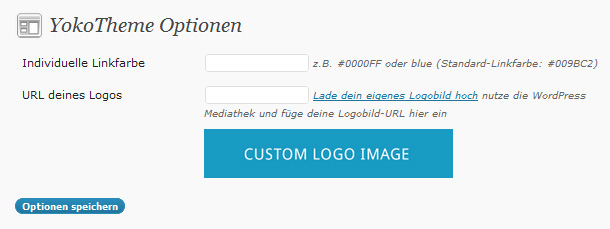
Wenn du deine Linkfarbe als Hexwert eintippst (z.B. #009BC2) musst du darauf achten, dass du das #-Zeichen mit angibst. Alternativ kannst du auch red, green, blue… als Farbwerte angeben.
Für dein Logobild kannst du ein individuelles Format wählen. Dein fertiges Logobild lädst du dann im .jpg oder .png Format über die WordPress-Mediathek hoch. Dort kopierst du die URL des Bildes. Diese URL fügst du dann einfach in den Theme-Optionen ein.
2. Individuelle Kopfzeile (Header)
Um ein eigenes Headerbild einzufügen, wählst du im Adminbereich unter Design den Punkt Kopfzeile aus.
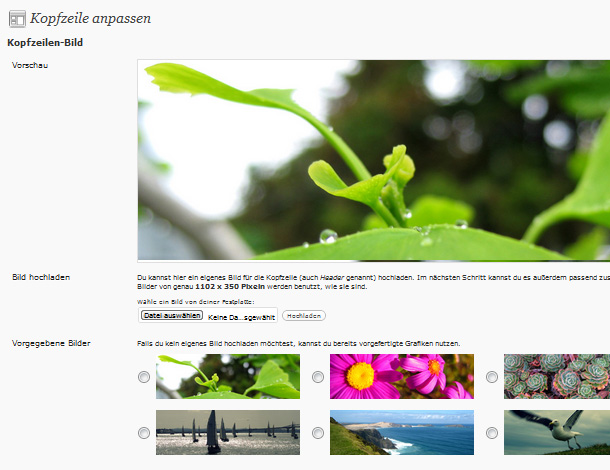
Hier kannst du entweder eines der vorgegebenen Headerbilder von Yoko auswählen oder du lädst deinen eigenen Header hoch. Dein Bild sollte bereits passend auf die Größe 1102×350 Pixel zugeschnitten sein.
Mit Hilfe des Buttons Kopfzeilen-Bild entfernen hast du außerdem die Möglichkeit komplett auf ein Headerbild zu verzichten.
3. Individueller Hintergrund
Unter Design / Hintergrund kannst du eine andere Farbe oder ein Hintergrund-Bild für deinen Blog wählen.
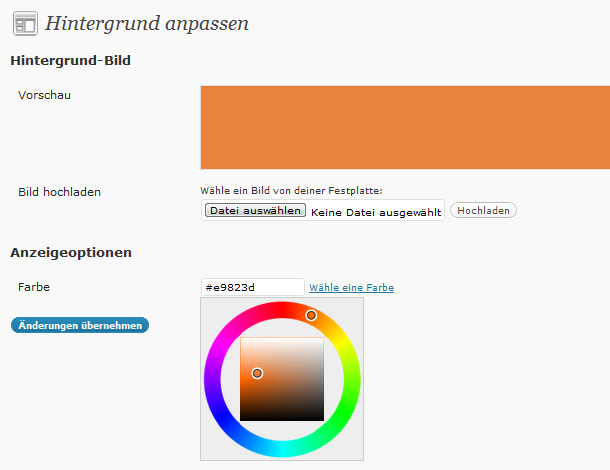
Mit Hilfe des Farbwählers beim Link „Wähle eine Farbe“ kannst du deine Farbe direkt auswählen. Wenn du ein Bild als Hintergrund nutzen möchtest, kannst du dieses horizontal und vertikal wiederholen, um so ein Muster zu erzeugen. Dein Bild könnte z.B. nur eine Größe von 100×100 Pixel haben und sich dann wie Kacheln wiederholen. Auf diese Weise ist deine Bilddatei nicht so groß und deine Webseite kann schnell im Browser laden.
4. Anpassung der Hauptnavigation
Um die Hauptnavigation oben rechts im Theme-Layout anzupassen, kannst du die individuelle Menü-Funktion von WordPress nutzen.
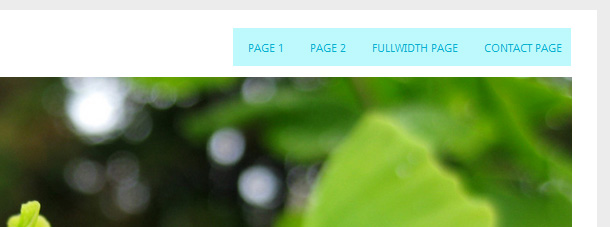
Unter Design / Menüs kannst du dir ein individuelles Menü aus benutzerdefinierten Links, Seiten und Kategorien anlegen und dieses dann im Optionsfeld „Anordnung im Theme“ oben links im Adminbereich als Hauptnavigation auswählen. Dein Menü erscheint jetzt automatisch in der Navigation oben rechts im Theme-Layout.
5. Zusätzliches Navigationsmenü (Sub Menu)
Ein weiteres Yoko-Feature ist das zusätzliche Menü unterhalb des Headerbildes.
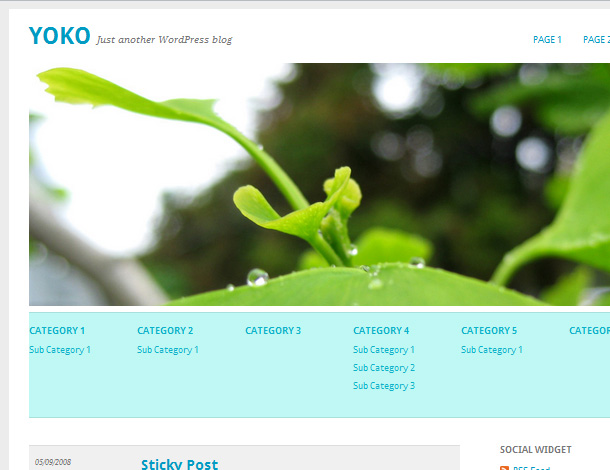
Über die Individuelle Menüfunktion (seit WordPress 3.0) kannst du so ein weiteres Menü mit jeder Menge Platz für Untermenüpunkte nutzen. Um das Sub Menu zu aktivieren, wählst du in deinem WordPress-Adminbereich unter Design den Punkt Menüs aus. Lege hier ein neues Menü mit dem Namen »Sub Menu« an und füge Kategorien, Seiten oder individuelle Links ein. Nachdem du dein neues Menü gespeichert hast, wird es im Theme angezeigt.
6. Artikel-Formatvorlagen (Post Formats, seit WordPress Version 3.1)
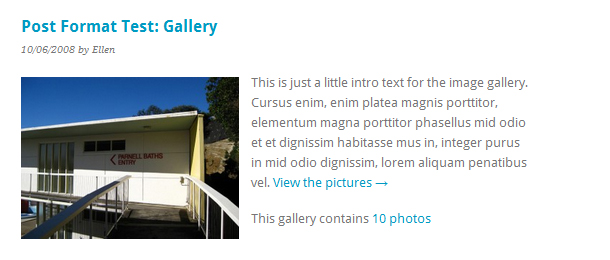
Yoko unterstützt die Artikel-Formatvorlagen Standard, Aside (kurze Notiz), Gallery (Bildergalerie), Link, Video, Image (einzelnes Bild) und Quote (Zitat). Während des Anlegens eines neuen Artikels wählst du das gewünschte Format einfach im Feld „Artikel-Formatvorlage“ aus.

Die einzelnen Formate werden dann in der Artikel-Übersicht deines Blogs individuell angezeigt.
7. Artikelbilder (Post Thumbnails)
Für deine Artikel kannst du auch individuelle Artikel-Vorschaubilder (thumbnails) nutzen.
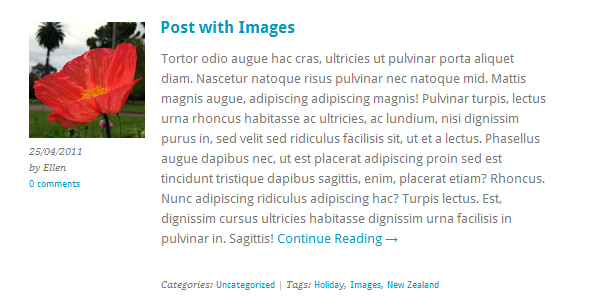
Die Vorschaubilder haben das Format 140×140 Pixel (größere Bilder werden automatisch verkleinert). Beim Anlegen eines Artikels lädst du dein Vorschaubild über die Funktion „Artikelbild“ im Adminbereich von WordPress an.
8. Das Social-Links Widget
Das Yoko Theme hat ein individuelles Social-Links Widget. So kannst du in einer der beiden Sidebars auf deine weiteren Profile im Internet verweisen.
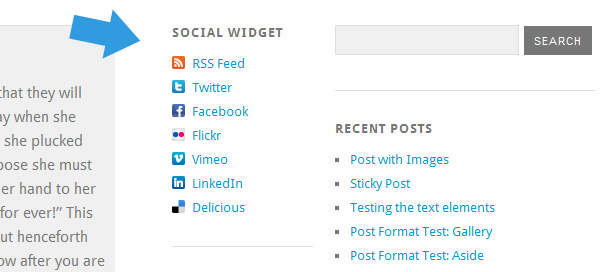
Um das Social-Links Widget zu verwenden, ziehe unter Design / Widgets das Yoko Social Links Widget in die Sidebar 1 oder die Sidebar 2. In den Widget-Einstellungen kannst du jetzt den Titel des Sidebar-Elements, sowie individuelle Link-Texte und die URLs zu deinen Online-Profilen eintragen.
9. Autorenfeld
In der Einzelansicht eines Artikels kannst du ein Autorenfeld mit Gravatarbild und Autoreninfo anzeigen.
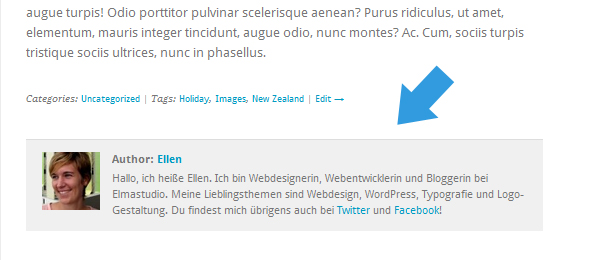
Um diese Option zu nutzen, füllst du einfach einen Text unter „Biographische Angaben“ in den Profil-Einstellungen unter Benutzer ein. Das Autorenfeld erscheint dann automatisch unter jedem Artikel.
10. Verschachtelte Kommentare
Das Yoko-Theme unterstützt verschachtelte Kommentare (threaded comments). Das bedeutet auf jedes Kommentar kann über den Antworten-Link direkt geantwortet werden. Die Antwort-Kommentare werden im Layout eingerückt dargestellt. Eine Demo der Threaded-Comments Funktion kannst du dir in der Yoko Live-Demo anschauen.
11. Theme Übersetzung
Yoko ist für die Theme-Übersetzung vorbereitet. Derzeit ist das Theme in Englisch und Deutsch übersetzt. Weitere Sprachen oder Änderungen in der Übersetzung kannst du mit Hilfe des WordPress-Plugins „Codestyling Localization“ vornehmen. Auf der Plugin-Homepage findest du eine sehr nützliche Dokumentation zur Verwendung des Plugins.
12. Individuelle Theme-Anpassungen mit Hilfe eines Child Themes
Falls du das Yoko-Theme noch weiter individuell anpassen möchtest und z.B. die Styles in der style.css Datei ändern willst, solltest du am besten ein eigenes Child Theme für deine Anpassungen anlegen. Auf diese Weise gehen deine eigenen Anpassungen bei einem späteren Update von Yoko nicht verloren bzw. werden überschrieben. Im Artikel „WordPress Theme-Anpassung mit Hilfe eines Child Themes“ findest du eine Anleitung, um dein Child Theme anzulegen.
Wir hoffen dir gefällt das Yoko WordPress-Theme. Wenn du Fragen zum Theme hast oder einen Fehler im Theme entdeckst, schreibe uns doch am besten einen Kommentar oder fülle unser Kontaktformular aus. Wir freuen uns sehr über dein Feedback, weitere Anregungen und Fragen!
English Theme Documentation
Yoko is a modern and flexible WordPress Free-Theme. With the responsive Layout the theme adjusts different screen sizes. Therefore the Yoko design is optimized for big desktop screens, tablet pcs like the iPad or small smartphone screens. To make your blog even more individual you can use the new post formats (like gallery, aside or quote), choose your own logo and header image, customize the background and link color. Just have a look at the Yoko live demo or download Yoko right away to test it on your own blog.
Live demo and download
Yoko Theme Overview


iPad portrait mode and smartphones, one-column layout.
The theme features
- responsive layout with CSS3 Media Queries: The blog layout adjusts to different screen sizes and is therefore optimized for mobile devices such as tablet pcs and smartphones.
- HTM5 (fallback for IE < 9)
- custom link color, header image, background and logo image
- optional additional navigation menu (Sub Menu) below the header image
- theme options page
- Yoko social links widget with mini icons (for RSS, twitter, facebook, flickr, vimeo, linkedin and delicious)
- post formats for standard, aside, gallery, link, video, image and quote (you need to have WordPress 3.1 installed)
- threaded comments
- post thumbnails
- custom CSS Styles for the Contact 7 form WordPress plugin
- Using of Google web fonts Droid Sans and Droid Serif
- translation-ready (currently the English, German and French translations are available)
The theme options
Just download the Yoko theme and unzip the themes folder. Upload the Yoko theme folder with an ftp program (like filezilla) into your WordPress installation folder wp-content/themes/….
To use the Yoko theme after uploading it go to your WordPress admin panel and choose Appearance / Themes. Here you can see the Yoko theme in the list of available themes and you can choose to activate it.
1. Custom link color and logo image
To use a custom link color or logo image go to Appearance / theme options page.
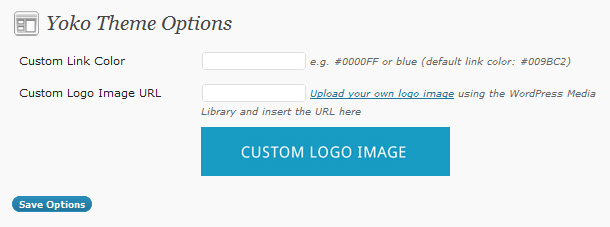
Here you can type in your own link color using the hex term like #009BC2 (don’t forget the symbol #) or a color term like red, blue or green.
Your logo image can have an individual pixel size. Just upload your logo image to the WordPress media library, copy the image URL and paste the URL into the theme options page.
2. Custom Header Image
To use an individual header image go to Appearance / Header.
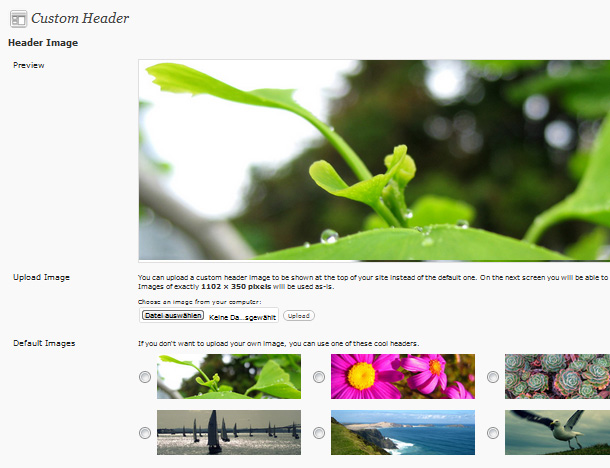
Here you can upload your own header image in the size 1102×350 Pixel, pick one of the other header images that come with the Yoko theme or choose not to use an header image at all.
3. Custom Background
In the admin panel choose Appearance / Background to pick your own background color or upload a background image.
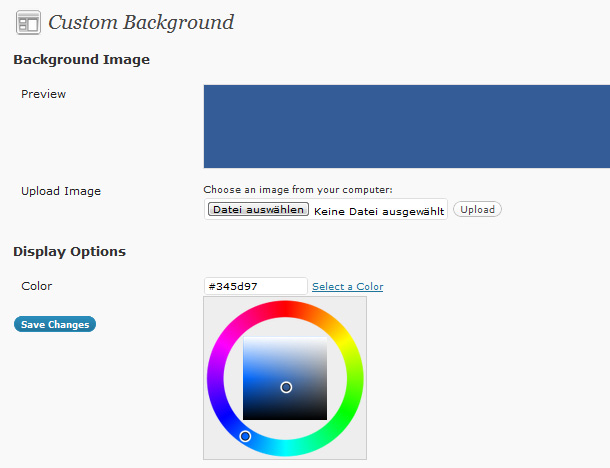
The image doesn’t have to be very big, you can prepare a small image (like 100x100px) and choose to repeat the image horizontally and vertically. This way your website loads faster into the browser because you can decrease the background image file size.
4. Customize the main navigation
If you want to customize the apperance of the main menu (at the top right side of the theme layout) you can use the WordPress custom menu option.

Just set up your individual navigation menu (Appereance / Menus) and mark it as the Primary Navigation in the Theme Locations option field (at the top left side of the menu admin panel).
5. Additional navigation menu (Sub Menu)
One more Yoko theme feature is the optional additional navigation menu right below the header image.

To use this additional menu option set up an custom menu with the name „Sub Menu“ under Apperance / Menues. You can use up to seven main menu terms and multiple sub menu terms. Just drag’n’drop the sub menu terms a little bit to the right to mark them as sub level. After you save your „Sub Menu“ navigation menu you will see it in your blog layout.
6. Post Formats (WordPress feature since version 3.1)
Yoko also supports the new post formats feature. Right now you can choose your posts to be standard posts, aside (a short note), gallery, link, video, image or quote posts.

The different post formats will then have different styles in your blog design.

7. Post Thumbnails
In the Yoko theme you can show to include post thumbnail.

The Thumbnail image size is 140×140 Pixel (bigger images will automatically be resized). To add a thumbnail to a post just upload it using the option field „Featured image“ in the „Edit Post“ admin window.
8. The Yoko Social Links widget
Yoko has a custom widget with mini icons to link to your social profile sites like Twitter, Facebook, Flickr, Vimeo, LinkedIn, Delicious or to your RSS Feed.

To use the widgets choose Appearance / Widgets in the admin panel and drag’n’drop the Yoko Social Links Widget into one of the two sidebars. In the Widgets Options you can add a widget title and your link texts and URLs.
9. Author description
To show an author description text with gravatar image at the end of every post just fill out the „Biographical Info“ in the Users profile.

After updating the info the author info field will show up automatically at the end of every single post page.
10. Threaded Comments
Yoko also supports the WordPress threaded comments feature. There will be an reply button after every comment to reply directly to an individual comment. If the button downn’t show up you might have to enable the threaded comments option under Settings / Discussion / Other comments options.
11. Theme translations
Yoko is ready for theme translation. Right now there is the default English and a German translation available. You can add your own translation or customize an existing translation very easily by using the WordPress plugin „Codestyling Localization“. At the plugins homepage you can find a detailed plugin description.
12. Customizing Yoko by creating a child theme
In case you want to customize the Yoko theme a little further and you therefore change the code in the themes Styleeheet or any of the theme template files please consider creating a child theme for your changes. Creating a child theme is very easy and it saves all your individual changes from being overwritten by a future update of the Yoko theme. You can find more information on creating a child theme in the WordPress Codex.
We hope you like the Yoko WordPress theme. To ask any question about the theme or report a problem just write us a comment or a message using the contact form. We are looking forward to your feedback, questions and suggestions!
Schreibe einen Kommentar zu Christoph Antwort abbrechen